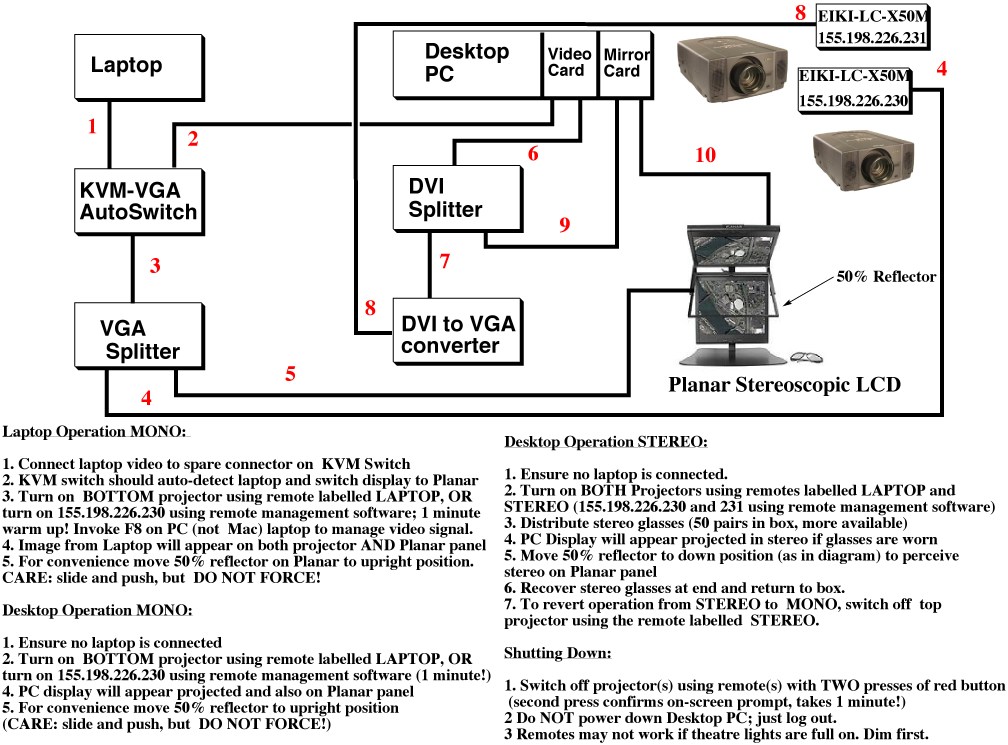
Can be done either with the remote units, or below online using the computer. An operating manual
for the remotes is available here. The Model type is EWiki LC-X50M.
 |
- Login in using your regular College login and
password.
- A program called NetControl needs to be run.
An icon should be on the desktop, but if you cannot
find this, use Programs => QuickLogix =>
Netcontrol => Netcontrol
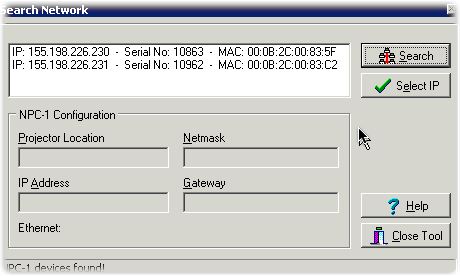
- From the initial panel that appears Select Network,
then Search from the panel that appears.
- Two devices should appear in this display.
Projector 226.230 is in fact the bottom unit, and
226.231 is the top unit. If you want to project a
laptop, make sure that unit 230 ONLY is switched
on.
|
 |
|
- Highlight one projector (230 for laptops) and
Select IP.
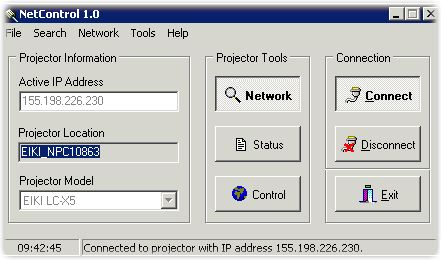
- In the main panel, the connect button now becomes
available. Before doing so, select the Projector model
as EIKI LC-X50M, and then press
Connect (click here for air filter cleaning and lamp replacements)
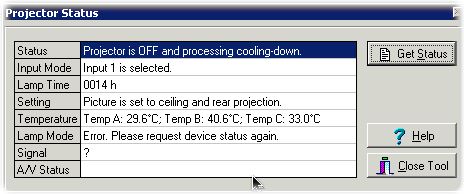
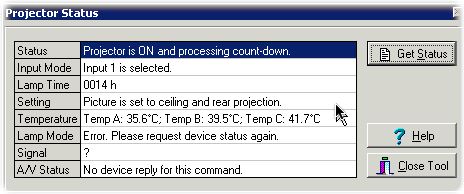
- Next select Status and Get Status from the
panel that appears.
|
 |
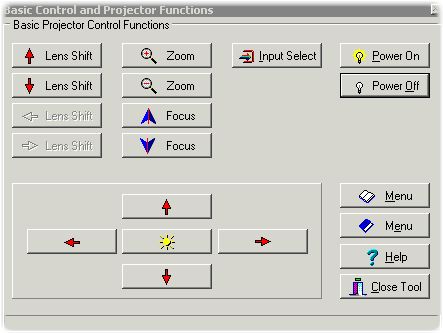 |
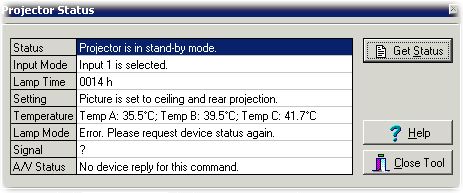
- To switch a projector on, select Control and
from that panel, Power On. The status display,
when updated, will reflect the power on cycle (about 2
minutes). The display also reflects the Lamp time. We
expect perhaps 4000 hours of life (The lamp intensity
is currently set to Economode. If anyone really want a
brighter screen, you can increase the intensity to
full).
- If for some reason the computer power on cycles
does not work, then Remote control units (one per
projector) are available. They are normally held by
Pete Sulsh. One press of the red button to switch on,
two is to switch off. They are not left in the theatre
to avoid "evaporation".
- There should not be any normal need to adjust the
projector settings, but one artefact which can happen
is that the image can dislocate off the screen by about
15 cm. To correct this, select the topmenu item
from the Control panel. A menu appears on the projected
screen. Select the red right arrow from the Control
panel until an item called PC Adjust appears on
the projected screen. Now press the yellow "sun" on the
Control panel to select this item. It will take about 5
seconds, after which the displayed image should again
be centered onto the projector screen. Press the second
Menu item to remove the menu display from the
projected image.
|
 |
|
|
- If you want to work in stereo, you will now have to
repeat the above cycle for the second projector. But
first, you have to disconnect from the first one
and then repeat 4-8 above for the second projector. At
this stage both projectors should be on.
- You will need to put on a pair of
stereo-glasses. These are normally held with
Pete Sulsh, and with the Faculty IT support team in
room 134. These will normally be issued at the start of
a lecture, and collected by the organiser at the end of
the lecture. Some people may feel a little nauseous
when the stereo-projection commences. It takes the
brain a few seconds to accommodate, and the odd feeling
passes quite quickly if it occurs at all. If the odd
feeling persists, close your eyes and just listen!
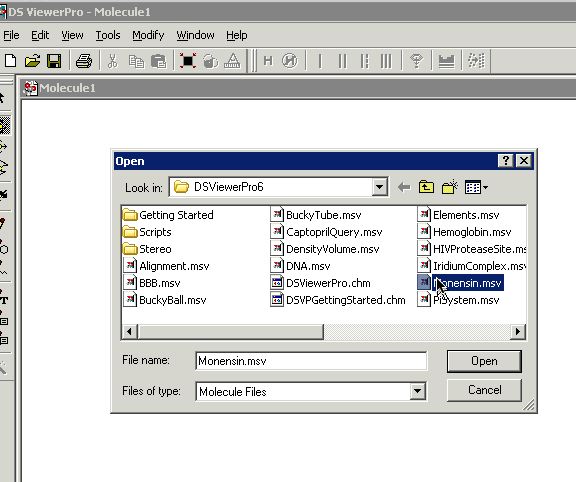
- To project in stereo you will have to use a
stereo-enabled program. The best for molecular
projection is DS Viewer Pro, an icon for which should
be on the Desktop (or via Programs/Accelrys DS
ViewerPro 6.0/DS ViewerPro 6.0). From the File/Open
menu of this program, navigate to a molecule file (the
default navigation is to an examples folder). Most 3D
molecule file types are supported by the program.
Sources for 3D molecule coordinates are most often
either the Cambridge Crystallographic database (you can
save as a CIF and open this in DS Viewer directly) or
from molecular modelling calculations.
|
 |
|
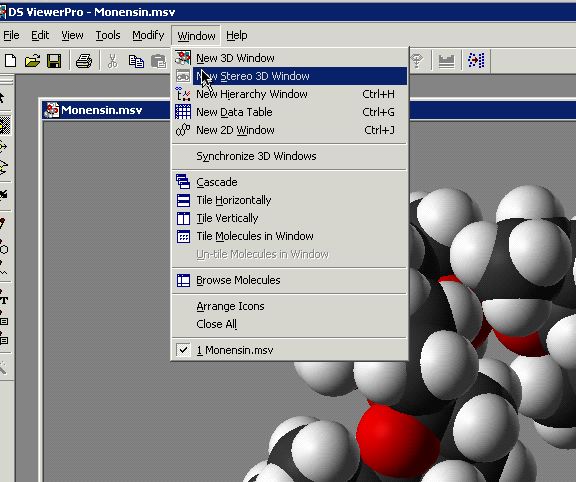
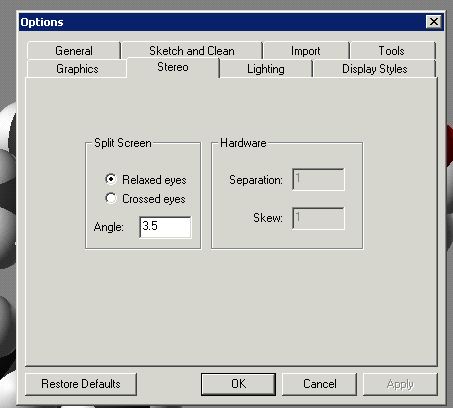
- After (not before) you have loaded the molecule,
the Stereo mode has to be switched on. You may wish to
then optimise the stereo effect by going to
View/Options, and tweaking the Stereo/Separation
(recommended 4) and Skew settings (recommended 5). To
save these settings, you will have to save the molecule
file.
|
 |
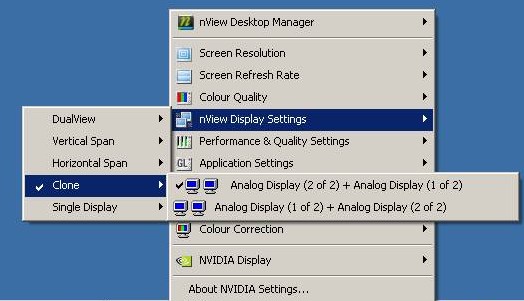 |
- It is possible that the New Stereo 3D Window
option in the Window menu of DS Viewer Pro may be
grayed out, in which case Stereo display will not be
enabled. To re-enable it, go to the "system tray" in
the toolbar at the bottom of the screen, and open up by
right-clicking the nView Desktop manager. From nView
display settings, ensure that Clone is enabled, rather
than Single Display (this latter mode is unfortunately
a side effect of connecting to the computer using
Remote Desktop, which sets Single Display mode and does
not reset it to Clone mode when finished).
|
|
 Mono or Stereo Projection mode (built in computer, Input
1, Projector 230 and/or 231)
Mono or Stereo Projection mode (built in computer, Input
1, Projector 230 and/or 231)