
 |
 |
The Quick Reference Guide (Commander Version 2.1 and higher)
 |
|
Database: The name of the
loaded database is displayed in the ![]() listbox; other
databases can be chosen here if there are any available
listbox; other
databases can be chosen here if there are any available
Context: The display mode
of hits can be chosen from the ![]() listbox:
listbox:
The default is Automatic Context Selection (menu Options); e. g. the display context is chosen by the kind of search that is performed, but you can change the context manually.
![]() The target display context has to be
chosen before performing a search!
The target display context has to be
chosen before performing a search!
1.3 Opening the Structure or Fact Editor
or
or
 |
Windows-type Menu Atom, bond and template buttons Short-cut buttons for some features of the Menu Toolbox Keys:
|
Atom buttons ![]()
Further choice of atoms as well as generic groups:
 |
|
Bond buttons: single, double,
triple ![]()
Further choice of bonds:
 |
|
| Stereo information will only be taken into account in a search if the Structure Query Options (see 2.7) have been set to absolute stereo search |
Clicking one of the ![]() -buttons
pastes the corresponding ring into the structure window
-buttons
pastes the corresponding ring into the structure window
 |
Annelated rings: drag
the square in the middle of the bond to the bond you want
to fuse Spiro-fused compounds: drag the square at the atom to merge it to another atom |
Template files contain pre-defined molecules, substructures as well as functional groups
Make sure you follow the
structure conventions used in the Beilstein database (see
manual); if you are not sure how to draw a functional group
choose it from the template file "residue.bsd".
2.6 Setting Atom Attributes (individual attributes)
On clicking at an atom (edit mode) an atom dialog box appears; further atom specifications such as number of free sites, charges, radicals, exact mass, set attachment points etc. can be defined.
| You can allow or exclude isotopes (apart from D and T) and set or delete maximum free sites after selecting the atom(s) within the menu Query |
2.7 Structure Query Options (global attributes)
Options which will be taken into account for the whole structure query can be set
These options define if stereochemistry is taken into account and if tautomers etc. are allowed.
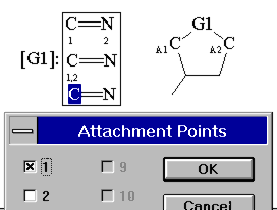
2.8 Creating User-defined Generic
Groups ![]()
For fragments containing more than one atom you have to set attachment points:

| To define a frequency click at the [Gn]:-symbol marking the generic group (edit mode) (see manual for details) |
2.9 Creating User-defined Atom
Groups ![]()
| You can always edit and delete structures within a Gn-group or add further structures |
| To see the definitions of the pre-defined generic groups listed in the table use the help button and select "pre-defined generic groups" to view the hierarchical order |
| The pre-defined generic groups except G and G* can only have one bond to the parent structure whereas user-defined generic groups and atom lists can have more than one bond |
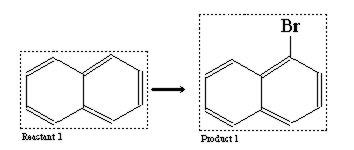
First draw the molecules in the
structure edit mode, then switch to reaction edit mode by using
the ![]() -button or choose from the menu Editmode: Reaction.
-button or choose from the menu Editmode: Reaction.
The function bar changes to allow reaction role setting and the select mode is activated.
Select a molecule and press the ![]() /
/![]() -buttons
to define its role as reactant or product
-buttons
to define its role as reactant or product

2.12 Further Reaction Attributes (optional)
Mapping: links corresponding atoms in the reactant(s) and product(s) respectively by drawing a dashed line between them in the same way a chemical bond usually is drawn
Reaction centre: defines that a reaction must take place (or must not take place) at a particular atom
Bond change: defines if and how a particular bond is altered during the reaction
Those reaction attributes are set in the edit mode by clicking at the atom or bond (reaction mode)
Use the ![]() -button to delete
product and reactant definitions
-button to delete
product and reactant definitions
Use the ![]() -button to delete all
the mappings
-button to delete all
the mappings
Change the structure of the
molecules taking part in the reaction by switching to the
structure edit mode with the ![]() -button or selecting Editmode:
Structure from the
menu.
-button or selecting Editmode:
Structure from the
menu.
2.13 Special Hot Keys (Structure Editor)
| Ctrl + D | delete all | N | reset average bond length to standard |
| Ctrl + E | copy all | F | fit structure into whole window |
| Ctrl + A | select all | C | centre structure within the window |
| S | switch to structure edit mode | + | scale up structure |
| R | switch to reaction edit mode | - | scale down structure |
| Shift + Click (edit mode): replaces an exsisting atom or bond by the one currently active | |
| Shift + Drag (select mode): copies the selected structure |

Fill in the code of the field you want to search for:
Fill in the search term(s) (e. g. values, keywords, phrases) you are looking for:
Use the logical operators proximity, and , not, or to combine fact queries:
| If you use the
"expand"-function by clicking the |
|
| The F3-key opens a window where you can type in the query |
3.4 Special Hot Keys (Fact Editor)
| Ctrl + X | Cut Query | cuts the whole fact query |
| Ctrl + C | Copy Query | copies the whole fact query |
| Shift + Del | Cut Selection | cuts the field selected previously |
| Ctrl + Ins | Copy Selection | copies the field selected previously |
| Ctrl + V | Paste | caution: pasting a whole query will delete the lines written previously |
| Ctrl + D | Delete All | deletes the whole fact query |
| Ctrl + L or |
Delete Line | deletes the single fact query line the cursor is placed in |
After performing a search open
the Display
Hits-Window by the ![]() -button
-button
4.1 Customising the Display of the Hits with the View-Menu
Short/Full-Display
(![]() -button): changes between full and short display
-button): changes between full and short display
Full display: each hit in its own window
| Identification: shows only Identification (IDE)-data of each hit | |
| All Fields: displays all available fields of each hit | |
| Hit Only: displays besides IDE-data only the data of the facts that have been searched for | |
| User View: shows only those fields that have been selected by the user (see Options-menu) |
Short
display: within one
window up to sixteen hits are shown (see Options-menu 4.2)
| Structures Only: displays structure, molecular formula and BRN for each hit | |
| Facts Only: displays the BRN, Chemical Name and some field codes for each hit | |
| Structures and Facts: displays BRN, Chemical Name, structure and some field codes |
| Customization of the Hit Display applies to printing |
Field
Availability (![]() -button): opens an additional window which shows
the names and codes of all available fields including the number
of occurences of each field for the current hit; you can browse
the list and select a field by double click for immediate
positioning in the main document.
-button): opens an additional window which shows
the names and codes of all available fields including the number
of occurences of each field for the current hit; you can browse
the list and select a field by double click for immediate
positioning in the main document.
Highlight Hit: highlights the data or (sub)structures that have been searched for
Include
structure (![]() -button):
shows structures of the reactant(s) and product(s) for each
displayed reaction as thumbnail sketches
-button):
shows structures of the reactant(s) and product(s) for each
displayed reaction as thumbnail sketches
Include Field Availability: displays a table of all available fields after the IDE-data for each hit
Preparation: Displays only those reactions in which the title compound is product of the reaction (applies only to graphical reactions)
Structure (![]() -button): shows or hides an additional window with
the molecular structure for each hit
-button): shows or hides an additional window with
the molecular structure for each hit
4.2 Change Settings with the Options-Menu
Select Short Rows and Columns: changes the number of hits within the short display; up to four rows and columns can be selected independently (this has no effect on the Short Display in citation context)
Define User View: Sets a user-defined filter for the display of the hits; the fields can be selected and combined freely from the data structure displayed in the user view window
| "Define User View" does not automatically activate it (see View-menu) |
4.3 Browsing the Hitset (Short Cuts)
| Menu Edit: Go to hit |
Button |
Hot Keys |
| First Hit | Ctrl + Home | |
| Previous Hit | Ctrl + PgUp | |
| Next Hit | Ctrl + PgDown | |
| Last Hit | Ctrl + End | |
| Select Hit Number | Alt + S |
| You can select and copy both structure and facts from the Display Hits and paste it into the Structure or Fact Editor where you can change and modify it to submit a new query. You can also paste it into any other application. |
5.1 The File Menu (Loading, Saving, Printing...)
The menu File always refers to the task which is currently active
If you choose Print within the Commander, the current query will be printed; within the Structure Editor the molecule(s) drawn there will be printed and within the Display Hits window you will get a printout of the data displayed.
The same applies to the Save-command; saving within the Structure Editor saves a copy of the structure currently drawn, within the Commander the query (both structure and fact) will be saved and in the Display Hit window the current hitset is saved.
| A hitset cannot be saved locally on the disk, it is always saved on the server. It is only valid for a current update of the database. | |
| Queries are best saved from the Commander rather than from the Fact or Structure Editor |
The current session is captured automatically as long as you are logged in. You can view former queries and hitsets by using the Hitset- or History-command:
History...: opens a window that contains all submitted queries, where you can browse and pick queries you want to use again.
Hitset...: opens a similar window with all retrieved hitsets
| The command New should never be used within the Structure or Fact Editor! | |
| The command New within the Fact or Structure Editor opens a new window of the same application, but it is not connected to the Commander; the information stored there will not be transferred to the Commander. |
The Menu Options also refers only to the currently active task (e. g. Commander, Structure or Fact Editor, Display Hits) and you can define different settings for each:
Molecule View...: the display mode of structures can be set for each application
Save Settings on Exit: can be enabled or disabled for each application independently
Connections...(only in Commander): shows the address of and the connections to the CrossFire server; these should be checked if problems with the login-procedure occur
Beilstein Homepage | CrossFire at MIDAS |
| © Beilstein
Informationssysteme GmbH © Data by Beilstein Chemiedaten und Software GmbH, Beilstein Institut für Literatur der organischen Chemie All rights reserved |